First look at Windows Embedded Standard 8- Creating a base image using the Image build Wizard

This guide walks you through the process of creating and capturing a basic Windows Embedded Standard 8 image. The intent is to familiarize you with the tools and processes required so that you can move on to more advanced scenarios. Please consult TechNet for the latest information on recommended practices for Windows Embedded Standard 8, I don’t offer any guarantee for the accuracy or reliability of this content, use at your own risk  :)

Like it’s predecessor, Windows 8 Embedded Standard includes an Image Build Wizard (IBW) that provides a simple mechanism to install the OS on a source computer for an image.  Afterward, command-line tools are used to generalize and capture the image to a .WIM file that can be used with deployment solutions like Configuration Manager 2012.

You will need a source computer (I used a Hyper-V VM with 1gb RAM and 127GB hard disk). You will also need the source files for Windows 8 Embedded Standard. The source file I downloaded was “en_windows_embedded_8_standard_image_builder_winzard_x86_dvd_1791542”. Insert the media or ISO into your DVD drive and boot to start the installation wizard.

Part I- Install Windows Embedded 8 Standard on a target computer:

1- The first screen is similar to that in Windows 7 Embedded Standard except that you have an “Install Now” button where there used to be a “Build an Image” button. Click “Install now”:

81

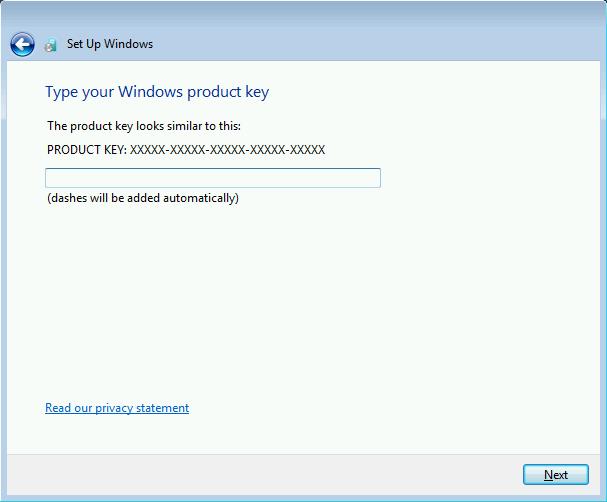
2- At the product key screen, enter your product key and click Next. We no longer have the option to leave the product key blank for an eval version as the ‘Next’ button is subdued until you enter a key:

82

3- Click “I accept the license terms” on the license terms screen and click Next

83

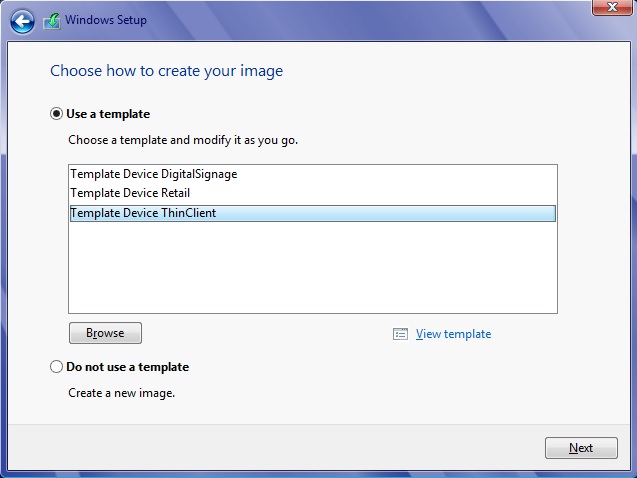
4- At the “Choose how to create your image” screen, I selected the “Thin client” template. You can create a new image without a template if desired. Click Next.

84

5- At the “Choose a language and other preferences” screen select your language and regional settings and click Next

85

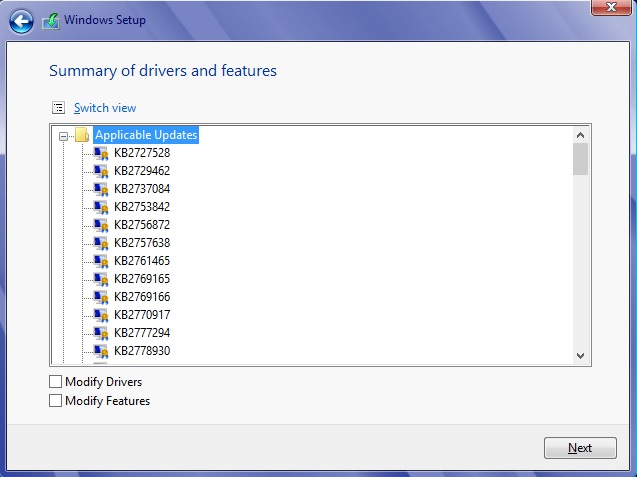
6- At the Summary screen you have the option to install additional drivers and/or features (you may need to resolve dependencies if you modify drivers/features). Click Next

86

7- Select the drive where you would like to install Windows and click Next

87

At this point you see the familiar “Installing Windows” screen. Files are expanded and installed.

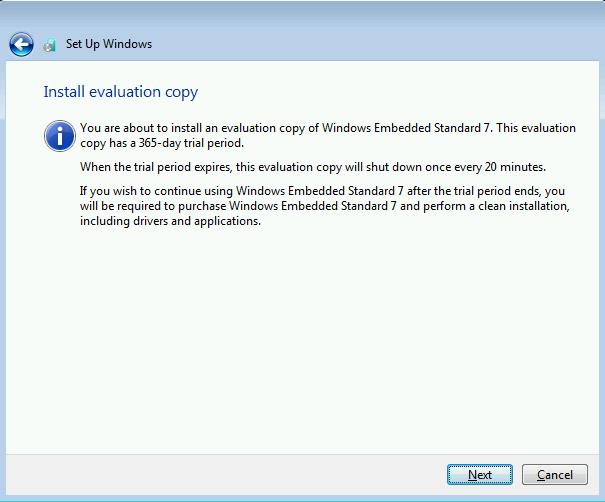
8- When complete you may see a warning that you are installing an evaluation copy (if you don’t have a full version key like me). Notice that there is no supported upgrade path, you must reinstall with a full product key if you wish to upgrade. Click Next:

88

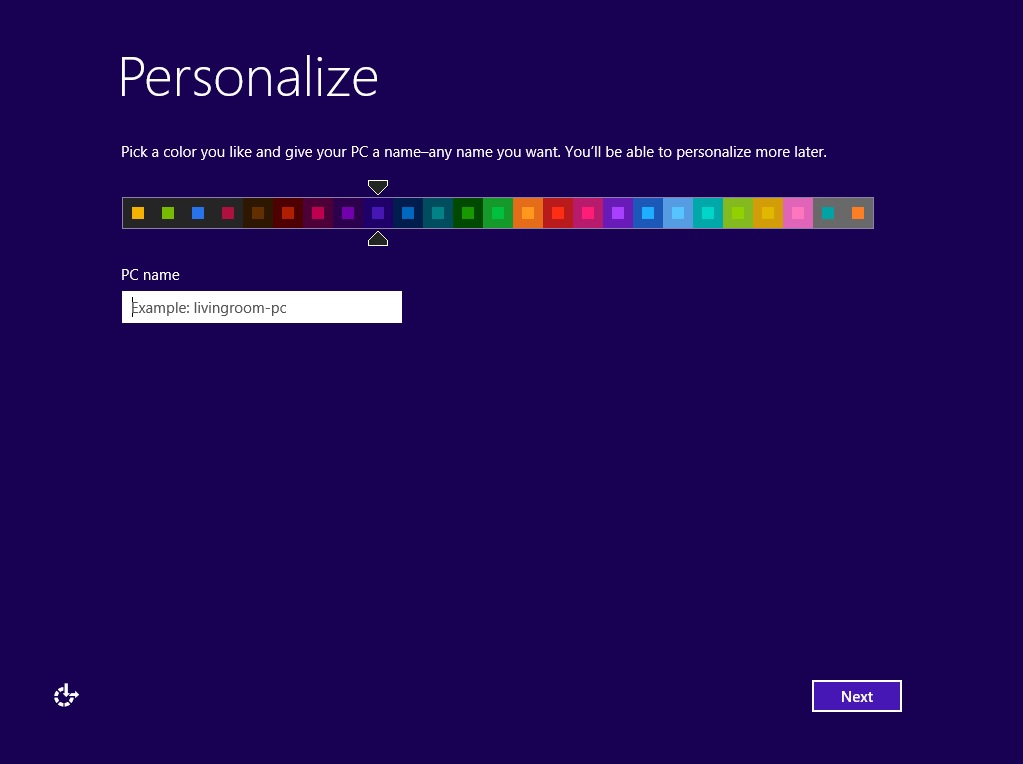
9- The next screen prompts you to choose a color scheme and computer name. Click Next when complete.

89

10- At the setting screen, select whether to use express settings or customize. Express settings turn-on Windows Update, the Customer Experience Improvement Program, and turn on location-based settings among other configuration settings.

810

11- If you select Customize in the previous step you will see a series of screens walking you through the different user configuration settings. For this demo I will use Express settings. Either way, you will wind up at this screen prompting you for an email address to sign into the device. Enter a valid email address and click Next.

811

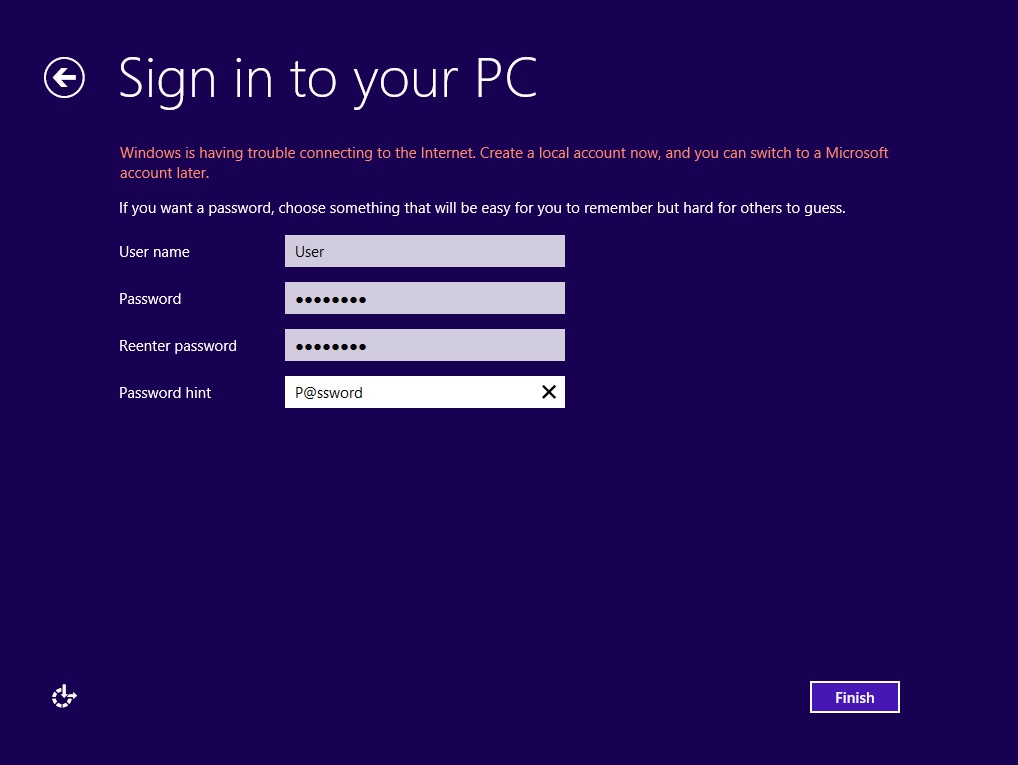
12- If no internet connection is available in the previous step you see this screen prompting to create a local user account. Click Finish when complete:

812

13- Settings are finalized and Windows 8 Embedded Standard launches. We are left at the familiar Start screen:

813

Here are a few interesting facts about the build:

  • The user account that you created is a member of the local Administrators group
  • The Administrator account and Guest accounts are disabled by default
  • Windows Firewall is enabled by default
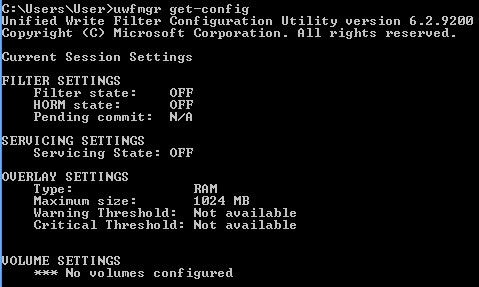
  • Write filter command line tools (fbwfmgr.exe and ewf.exe) are GONE by default!  Windows Embedded 8 includes a new write filter type, Unified Write Filter. It combines the functionality of Enhanced and File-based write filters. Enhanced and File-based write filters are included in Windows 8 for backward compatibility (mainly). Be aware that the old and new technology are mutually exclusive. If you have EWF or FBWF in your image, you cannot have Unified Write Filter. The reverse is also true…

If you built a test machine using this guide you will find that there is a new command-line tool available for the Unified write filter, UWFMGR.EXE. To check the write filter status with UWFMGR, type UWFMGR GET-CONFIG:

814

Part II Generalize your image to prepare it for capture

Sysprep is used to remove device and user-specific information from Windows before an image is captured. This is required for images that will be deployed to other devices.

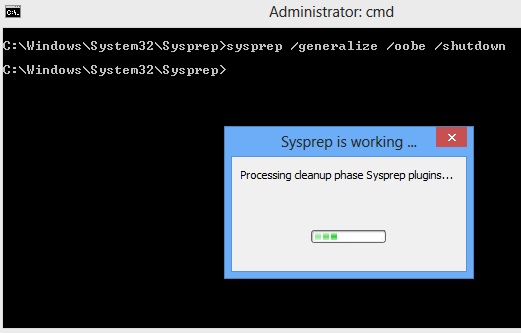
1. Open an administrative command prompt and switch to the C:\WINDOWS\SYSTEM32\SYSPREP folder. To generalize the image, run the command below (this will shut your device off so make sure you have already made any changes you wish to make):

Sysprep /generalize /oobe /shutdown

8Sysprep

2. Restart the device in Windows PE. You may boot from the Windows Embedded media (the en_windows_embedded_8_standard_image_builder_winzard_x86_dvd_1791542.iso file that we booted from to kick-off our Embedded build). Make sure you do not let it boot back into Windows Embedded or it will run through the Out of Box Experience (OOBE) and you will need to run the Sysprep command line again.

3- If you booted from the Embedded media you will be back at our initial screen. Click “launch Winpe command prompt” in the lower-Left corner of the screen. You should map a drive letter to a network location that is suitable for holding the Windows Embedded 8 image (I will map drive Z: for this demo).

4- At the command prompt type the following:
Reg load hklm\temp D:\WINDOWS\SYSTEM32\CONFIG\SYSTEM
(If the generalized Windows image is installed on a drive other than D:, replace D: with your Windows drive letter)
Next, type:
Reg delete hklm\temp\mounteddevices
Type Y when prompted to delete
Next, type:
Reg unload hklm\temp

8WinPE

5- Verify that bootmgr and boot\bcd files are present on the generalized OS drive. If they are not (they weren’t in my case) change to the WinPE drive at the command prompt and switch to the directory that contains BCDBOOT.EXE. Type the following:

Bcdboot d:\windows /s d:

8bcdboot

(again, if the generalized Windows image is installed on a drive other than D:, replace D: with your Windows drive letter)
Part III- Capture the Windows Embedded Standard 8 OS image

At this point you have a device with a generalized image that is ready to capture and apply to other devices. In Windows 7 we would use the ImageX tool to capture our image. You may notice that ImageX is no longer included in the Image Build Wizard Windows PE boot .iso as it was in Windows 7 Embedded. That’s because in Windows 8 we use the DISM tool, which is in the SOURCES folder on our IBW bootable WinPE disk. Use DISM to capture your image by following these steps (assuming you are already booted into Windows PE with a disk that includes the DISM tool):

***NOTE- At the time this document was written, the DISM version that is included in the IBW disk is outdated and does not support the image capture switch. You will need to have access to the DISM version that is included with the Windows ADK.

At the command prompt, type diskpart
The command prompt changes to a diskpart command prompt. Type list volume. Diskpart lists available disk partitions and their sizes:

8diskpart

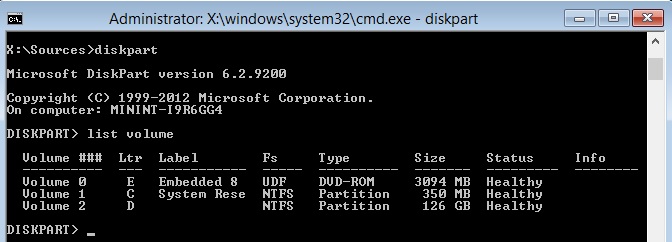
Note the disk letters and names:

  •  E: is the DVD ROM drive and doesn’t need to be captured
  •  C: is a 350mb drive
  •  D: is a 126GB NTFS partition. This would be our Windows drive that we want to capture

Type exit to leave diskpart

If you’re like me and like to measure twice and cut once, at the command prompt you can change to the D: drive and type DIR . If the drive is our Windows image, it should contain a WINDOWS folder whose create date is current (todays date).

So… Now we know we have a generalized Windows 8 Embedded image on the D: drive. We also have a mapped drive letter (I mapped Z: ) to hold our captured .WIM image. We are ready to run the following command line to capture the image:

Dism /capture-image /capturedir:d:\ /imagefile: z:\\WES8STD.WIM /name:”Windows 8 Embedded Standard”

This process will take a long time to complete. In my test it took much longer than what I was used to with ImageX.exe… Several times it stopped at a certain percentage where I thought it had stopped responding but it recovered. Be patient . When it finishes you will have a new Windows Embedded Standard 8 .WIM image that is suitable for deployment to other devices.

Creating a Windows Embedded Standard 7 SP1 image using the Image Build Wizard (IBW)

This guide walks you through the process of creating and capturing a basic Windows 7 Embedded Standard 7 image. The intent is to familiarize you with the tools and processes required so that you can move on to more advanced scenarios. Please consult TechNet for the latest information on recommended practices for Windows Embedded Standard 7, I don’t offer any guarantee for the accuracy or reliability of this content, use at your own risk  🙂

Building a Windows Embedded Standard (WES) 7 SP1 image is different from installing Windows Enterprise, you don’t insert a disk and run ‘setup’, and you can’t create a build & capture task sequence based on an existing .WIM file.

There are two tools used to create your image: The Image Build Wizard (IBW) and Image Configuration Editor (ICE). For simplicity this guide will use IBW to create a basic Windows Embedded Standard 7 image. The funny thing about the Image Build Wizard is that it doesn’t really build an image as the name sorta implies… You have to use other tools like Sysprep and ImageX to complete the task. Since Sysprep is built-into Windows 7 and ImageX comes with the Embedded media, you have all the software you need to create your image once you download the Embedded source files. The only thing you need is a lab environment.

When you download the source content for Windows Embedded Standard 7 you will have two Image Build Wizard files, one for 32-bit and one for 64-bit. There is another ISO file that contains the toolkit and ICE, but that will not be used for this demo. I will boot my VM from the 32-bit ISO. The file name is:

“Standard 7 SP1 32bit IBW.iso”

This ISO is a bootable WinPE disk that has all the files required to create your image using the wizard.

What you need:
I am going to create my image using a Hyper-V virtual machine. I have provisioned a machine with 1gb memory and 127gb hard drive. I have configured the VM to boot from the 32-bit ISO.

Part IInstall Windows Embedded Standard 7 on your device

1. Boot your device from the Embedded Standard 7 SP1 .iso
2. The first screen will prompt you to build an image or deploy an answer file/WIM. Select “Build an Image”

1

3. On the License Terms screen tick the “I accept the license terms” checkbox and click Next

2

4. The next screen prompts you to use an existing template or create a new image without a template. For this demo I will select the template, “Thin Client”. Select a template that suits your requirements and click Next.

3

5. At the “Choose a language and other preferences” screen, make your language and region selections and click Next

4

6. At the “Summary of drivers and features” screen I had some unmapped devices with my default Hyper-V setup. You may modify drivers or features by selecting the corresponding checkbox at this screen but I chose to live with the unmapped devices and click Next

5

7. Select the drive/partition where you would like to install Windows Embedded and click Next

6

At this point you see the familiar “Installing Windows” screen. Files are expanded and Windows is installed. When complete the machine will boot into the “Set Up Windows” screen.

8. At the “Set Up Windows” screen enter a user name and device name. Click Next.

7

9. Enter a password for the user account and click Next

8

10. Type in your product key, click Next.
(If you click Next without entering a key you will install a 30-day eval version)

9

11. My key is a 365-day evaluation version, so I get the following prompt. If you get this prompt, click Next:

10

12. The next screen pertains to Windows Update. Select how you would like updates to install. I chose “Ask me later”:

11

13. Select the date/time/time zone settings and click Next

12

14. Select the computer location from the three choices given. I chose “Work Network”:

13

Windows finalizes settings and we have a machine built with Windows Embedded Standard 7. Here are a few interesting facts:

  • The user account that you created is in the local administrator’s group
  • The Administrator account is created, but it is disabled by default
  • Windows Firewall is enabled by default
  • Write filters are disabled at this point. You can view the status of write filters by opening an elevated command prompt and typing one of the following, depending on whether you want to see the status for File-Based write filter or Enhanced write filter:

o File-based write filter (FBWF)- FBWFMGR /DISPLAYCONFIG
o Enhaced write filter (EWF)- EWFMGR

Part II- Generalize your image using Sysprep
Sysprep is used to prepare devices for imaging. It removes device and user-specific information so that the image can be re-deployed to different devices. This step is required for images that will be deployed to other devices. In this step we will run SYSPREP.EXE with the /generalize command line switch and the /shutdown switch so that our device shuts down after generalizing the image and the image can be captured.

1- Open an elevated command prompt and change to the C:\WINDOWS\SYSTEM32\SYSPREP folder. Type the following:

Sysprep.exe /generalize /oobe /shutdown

Sysprep processes and then shuts the computer off.

14

Part III- Capture your Windows Embedded image
In order to capture the actual image file (.wim) you will need to boot into another OS (typically Windows PE) and run ImageX.exe. This means that you will need bootable media with ImageX on it, and a destination drive to capture your image to (typically a network drive)

In my lab environment I have a domain controller that is a DHCP server. I have left the Windows Embedded Standard 7 SP1 .ISO attached to my virtual DVD drive. This media just happens to have ImageX on it… I used the following steps to capture my image:

1. Since I have left the Windows Embedded Standard 7 .iso attached to my virtual DVD drive, When I start the device I briefly see a prompt to “Press any key to boot from DVD”. When you see this prompt, press a key to boot back into the main Windows Embedded Standard 7 image build screen (Don’t let it boot back into Windows Embedded. If you do it will run the Out of Boxe Experience (OOBE) and you will need to run SYSPREP again).

If you boot back into the Windows Embedded Standard 7 IBW, notice that in the lower-left corner you have the option to “Launch WinPE Command Prompt” Click that option and a command prompt opens:

15

2. Map a drive to a network location where you would like to capture your image to. In the example above, I map drive Z: to my share on the lab domain controller. So, in my case I have the following:

• Drive C: has the embedded source device image that I want to capture
• Drive Z: is a network share that I have mapped a drive to, it will hold the captured .WIM file
• Drive X: is my Windows PE drive, the current OS that I am booted into and from which I will run ImageX

3. Enter the following command to capture your image:

Imagex /capture c: z:\embeddedimg\wes7sp1.wim “gold image”

The command will take several minutes to complete, depending on your network and PC speeds. When finished, your destination folder should have an image file suitable for deployment to a new device.  If you create an image package out of this .WIM file and apply it in a task sequence, the resulting builds will not run OOBE again.  The task sequence takes care of turning that off…  However, if you have an evaluation license key you will see a dialog box as you first log-in indicating that it’s an eval copy of Windows Embedded.

App-V 5.0 Virtual Labs

These are App-V 5.0 virtual labs provided by Microsoft. Included are lab manuals and virtual machines:

Subject Link
Intro to AppV 5.0 https://cmg.vlabcenter.com/default.aspx?moduleid=611a629e-32c0-4624-9ce1-183f64d32c8f
Installing and configuring https://cmg.vlabcenter.com/default.aspx?moduleid=4eb99298-aadd-4939-b9ce-607f267123cc
AppV basics http://cmg.vlabcenter.com/default.aspx?moduleid=3c830951-ff42-438b-bb02-81fbbc9eb8a3
Installing the sequencer https://cmg.vlabcenter.com/default.aspx?moduleid=77c56fe9-2d23-4721-bea9-04d9b08b588c
Sequencing apps https://cmg.vlabcenter.com/default.aspx?moduleid=cb0b84c7-6942-48d9-9885-559a611ccc6e
Advanced sequencing https://cmg.vlabcenter.com/default.aspx?moduleid=87eac491-4611-43fa-8e50-ad458af6deac
Sequencing Office 2010 https://cmg.vlabcenter.com/default.aspx?moduleid=cddafa7e-2602-4c21-9338-9fc381b144a6
Publishing apps https://cmg.vlabcenter.com/default.aspx?moduleid=68836e9c-a362-4d36-81ea-28e76702b2ae
AppV and ConfigMgr https://cmg.vlabcenter.com/default.aspx?moduleid=861e9d32-a9ec-419e-8929-f305a599be0f
Learning AppV basics http://go.microsoft.com/?linkid=9713042
AppV intermediate http://go.microsoft.com/?linkid=9713043
AppV- Standalone Clients http://go.microsoft.com/?linkid=9713044

Configuration Manager 2012 Virtual Labs

The following labs are provided by Microsoft to familiarize yourself with concepts of ConfigMgr 2012.  Be aware that the version of Configuration Manager 2012 may not be current in these labs, so there may be differences between the admin console layout & tools in your own environment vs. what you see in these labs.

Subject

Link

Introduction to CM2012

http://go.microsoft.com/?linkid=9793971

Application Management

http://go.microsoft.com/?linkid=9796179

Content Management

http://go.microsoft.com/?linkid=9796558

Managing Clients

http://go.microsoft.com/?linkid=9796564

Basic Software Distribution

http://go.microsoft.com/?linkid=9796016

Advanced Software Distribution

http://go.microsoft.com/?linkid=9796019

Software Updates

http://go.microsoft.com/?linkid=9795894

Endpoint Protection

http://go.microsoft.com/?linkid=9796038

Migration: 2007 -> 2012

http://go.microsoft.com/?linkid=9793970